Friday, July 20, 2012

Is GPU good for large vector addition?

Introduction

With more than one GPU programming interfaces available, there is a great interest in converting regular program to GPU program with two frequently asked questions.

  1. How much performance improvement can we expect from it?
  2. Which programming interface is better than others?

In this post, the performance of CPU and GPU are compared for vector addition and matrix multiplication, which are widely used building blocks for scientific application.

Additionally, the performance of OpenCL, CUDA, and PGI Accelerator on NVIDIA's M2050GPU are analyzed to compare different GPU programming interfaces.

1. Is GPU faster than CPU?

No - for vector addition

Yes - for matrix multiplication

Figure 1 shows 'elapsed time' for vector addition on CPU and GPU. CPU is about 4 times faster than GPU in this experiment.


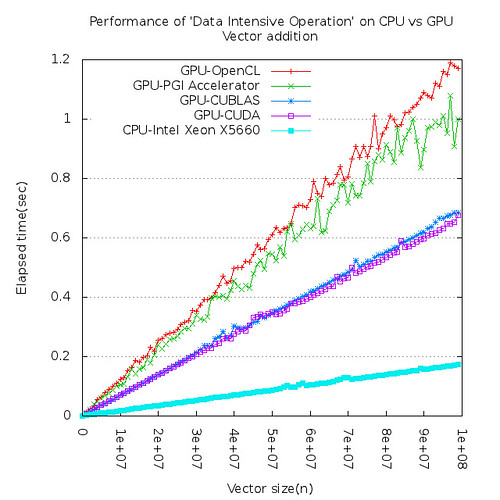
Figure 1. CPU is faster than GPU for vector addition

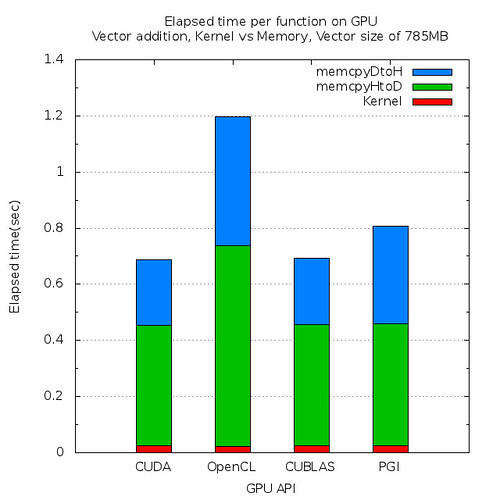
Figure 2. Elapsed time per function on GPU

Large vectors need to be copied from CPU memory to GPU memory through relatively slow PCIe bus and it overshadows the higher computational capability of GPU. Figure 2 tells us that most of time on GPU are used to copy data.

However, for matrix multiplication, GPU is 200 times or more faster than CPU. Computing intensive calculation such as matrix multiplication is best candidate for GPU.

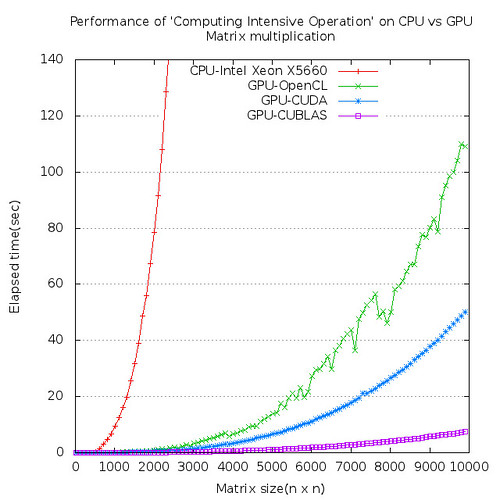
Figure 3. GPU is extremely faster than CPU for matrix multiplication

Most of times are consumed for computations and data transfer time is almost negligible for matrix multiplication on GPU.

Figure 4. Elapsed time per function on GPU

2. Is OpenCL better than CUDA?

Yes for compatibility

??? for performance

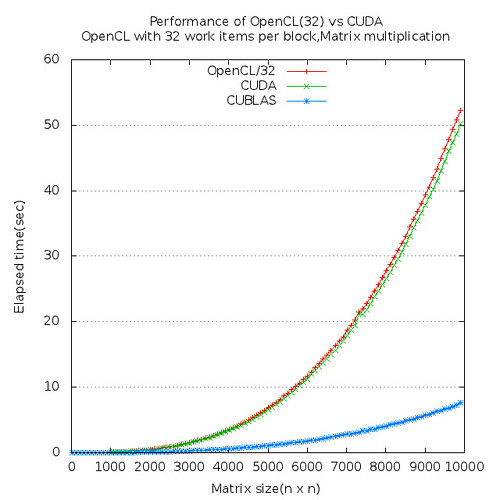
CUDA is about 5% faster than OpenCL for matrix multiplication in this experiment on NVIDIA M2050 platform.

Conclusion

To be able to get maximum performance out of NVIDIA GPU, try to take advantage of CUBLAS as much as possible. If there is any chance that your program need to be running on different GPU platform such as AMD or INTEL, etc, then use OpenCL for compatibility.

If you are interested in full article about this experiment, check here.


Thursday, May 17, 2012

Remote Visualization using TurboVNC and VirtualGL on Cluster


1. Purpose

Remote visualization is a technique to overcome two major difficulties of "local visualization." First, visualization process requires a high performance GPU device, but, not every local system has such device. Secondly, even if local system has a high performance GPU device installed, it might take unreasonably long time to transfer huge data from remote system(cluster) to local system for visualization. Those two difficulties can be resolved efficiently by using GPU device on cluster for rendering and displaying it remotely on the display of local system.


You will see these errors if you don't have appropriate GPU device on your local system.


With remote visualization, you will see those instead. Ta-da!


2. Requirements


These are software and hardware requirements for remote visualization on EOS cluster.

Software requirements : CentOS, TurboVNC, VirtualGL
Hardware requirements : NVIDIA GPU


3. Installation


3.1 Install X Window package on GPU node

Even though GPU node has no monitor attached, it still must have X Window package installed and running to provide virtual screen where GPU can draw objects on. These objects eventually will be displayed on physical monitor of local system through SSH tunnel.

$yum groupinstall "X Window System"


3.2 Install TurboVNC on GPU node
http://www.virtualgl.org/Downloads/TurboVNC

TurboVNC is a software that display a screen of remote system on monitor of local system via RFB(remote framebuffer) protocol.


3.3 Install VirtualGL on GPU node
http://www.virtualgl.org/

VirtualGL is a key software that actually utilize GPU on remote system and redirect drawing event to use hardware rendering feature.


3.4 Install TurboVNC on local system
During installation, select just vncviewer. vncserver is not necessary for local system.


4. Configuration

Since GPU node on EOS has no physical monitor attached to it, ‘--use-display-device=none’ option need to be used to configure X Window

$nvidia-xconfig -a --virtual=1024x768 --use-display-device=none
$/usr/bin/X :0 -ac -audit 0 -tst -auth /var/gdm/:0.Xauth -nolisten tcp vt7&
$cat ~/.vnc/xstartup
#!/bin/sh

# Uncomment the following two lines for normal desktop:
# unset SESSION_MANAGER
# exec /etc/X11/xinit/xinitrc

[ -x /etc/vnc/xstartup ] && exec /etc/vnc/xstartup
[ -r $HOME/.Xresources ] && xrdb $HOME/.Xresources
xsetroot -solid grey
vncconfig -iconic &
xterm -geometry 80x24+10+10 -ls -title "$VNCDESKTOP Desktop" &
twm &


User Guide

For remote visualization, user is required to go through 3 steps. First, start vncserver on GPU node, secondly, establish SSH tunnel between local system and GPU node via login node. Finally, start vncviewer on local machine to open remote display.


Terminal 1
Connect to login node(eos3)
Connect to GPU node(node349,node361,node350,node362)
Start vncserver
$vncserver


Terminal 2
Create SSH Tunnel
$ssh -L 10000:node349:5901 eos3.tamu.edu


Terminal 3
$vncviewer -medqual localhost:10000
$module load paraview
$vglrun glxspheres64
$vglrun paraview


Multiple GPUs
$vglrun -d :0.x paraview  % x is set to 0 for first GPU, 1 for second GPU, and so on.


Special for ABAQUS CAE

On some system, abacus cae has an issue with color scheme. In that case, set environment variable to fix it.

export XLIB_SKIP_ARGB_VISUALS=1

The reason of this issue is incompatibility between abaqus’s graphic toolkit(http://www.fox-toolkit.org/) and Compiz software package.


Wednesday, February 8, 2012

Setting up email server on CentOS 6.2 within 5 minutes

If you have only 5 minutes,  you can still setup an email server on CentOS 6.2. Don't waste it :)

This email server supports SMTP(TCP port 25) and IMAPS(secure IMAP,TCP port 993). Now, you can specify this as an outgoing and incoming email server on email client such as Thunderbird on your PC.

1. Install packages

Three packages are required for this. Install them if you haven't done yet.
$yum install sendmail
$yum install sendmail-cf
$yum install dovecot

The role of sendmail is to receive emails destined to you and keep them in your mailbox on email server. Then, dovecot actually delivers those emails to your PC when you open Thunderbird or Microsoft Outlook. For outgoing email, Thunderbird first contacts sendmail, then sendmail relays the email to final destination for you.

2. Configure sendmail

You just need to change 2 lines in configuration file /etc/mail/sendmail.mc

Comment out this to allow receiving email from anywhere.
dnl DAEMON_OPTIONS(`Port=smtp,Addr=127.0.0.1, Name=MTA')dnl


Add this line
FEATURE(`relay_hosts_only')dnl

Add your PC's full hostname in this file. Create one if this file doesn't exist.
/etc/mail/relay-domains

After changing configuration file, run this command to activate it.

$/etc/mail/make
$service sendmail start

3. Configure dovecot

You just need to edit two files.

In /etc/dovecot/dovtcot.conf, just edit these two lines
protocols = imap
listen = *, ::

In /etc/dovtcot/dovecot.d/10-mail.conf, edit these 3 lines

mail_location = mbox:~/mail:INBOX=/var/mail/%u
mail_privileged_group = mail
mbox_write_locks = dotlock fcntl

Start dovecot service
$service dovecot start

4. (Optional) Reconfigure iptables only if you are already using iptables
Add these 2 lines into /etc/sysconfig/iptables to allow email to go through firewalls.

-A INPUT -m state --state NEW -m tcp -p tcp --dport 25 -j ACCEPT
-A INPUT -m state --state NEW -m tcp -p tcp --dport 993 -j ACCEPT

then, restart iptables by
$service iptables restart

DONE

This is it. Of course, you can do more to enhance the security level of your email server. For example, you can make sendmail more secure by using SMTP over SSL. Feel free to suggest any idea about this article. Thanks.

Monday, January 30, 2012

2012 Spring Short Course, Introduction to Unix/Linux

Date : Jan. 30(Monday) ~ Dec. 2(Thursday).
Time : 3PM ~ 5PM
Location : Teague Rm# 103

It is highly recommended for all attendee to get your EOS login ID ready before the first day of class. EOS login ID is required for hands-on lab.

Introduction to Linux is a short course specifically designed for beginner to Linux/Unix system. It will cover basic concept of Linux and frequently used commands.

Basic
  • What is Linux/Unix?
  • File and Directory
  • Edit text file
  • Setup environment
  • Remote access
Advanced
  • Process,Signal
  • I/O redirection,Pipe
  • Alias
  • Permission
  • Kernel & Shell
For detail,

https://sites.google.com/site/tamulinux/introduction-to-linux

Please, post a comment or feedback about this class. It would be helpful to improve the class.
Thanks you.

Brian Kim